

0015D5D Elegance Dutch Lap
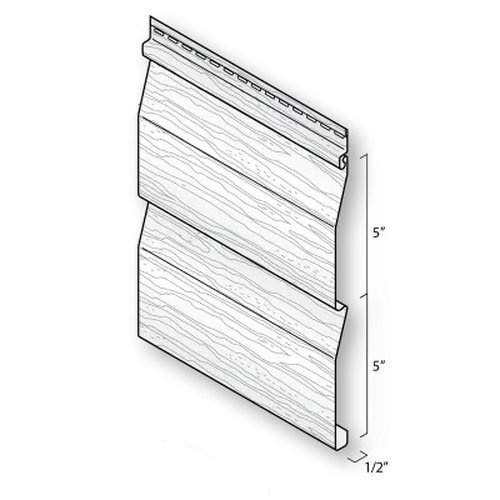
Double 5" Dutch Lap with deep shadow line and premium woodgrain texture — available nationally
| Length | 12' (3.66 m) |
| Panels/Box | 20 panels/box |
| Coverage | 200 sq. ft. (18.58 m²) per box |
Long Lasting Beauty
Kaycan Timberlake™ brings the subtle beauty of painted wood grain to vinyl lap siding. Exclusive Duratron™ Vinyl Technology and premium gauge thickness combine with deep shadow lines and a low gloss finish for authentic curb appeal that lasts. Eight profiles and 18 architect-curated colours — from Azure Blue and Terraverde to Sandalwood and Slate Gray — give builders and contractors the breadth to match any home style across Canada.
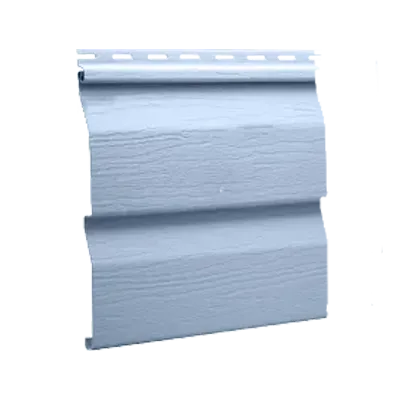

Azure Blue
Timberlake™ Collection
Timberlake™ Collection(16)
Timberlake™ Collection · Western Canada Only(1)
Timberlake™ Collection · Premium Color(1)
Colours shown are approximate representations only and may appear differently on screen than the actual product. Request a physical sample before making your final decision.
Kaycan Timberlake™ brings the subtle beauty of painted wood grain to vinyl lap siding. Exclusive Duratron™ Vinyl Technology and premium gauge thickness combine with deep shadow lines and a low gloss finish for authentic curb appeal that lasts. Eight profiles and 18 architect-curated colours — from Azure Blue and Terraverde to Sandalwood and Slate Gray — give builders and contractors the breadth to match any home style across Canada.
Kaycan Timberlake™ delivers the subtle, realistic wood grain texture of carefully painted wood with the easy maintenance of vinyl. Available in one of the industry's most comprehensive ranges of styles — 8 profiles spanning triple 3", double 4", double 4.5", and double 5" exposures — Timberlake™ is backed by Exclusive Duratron™ Vinyl Technology for long-lasting durability and colour retention. With perfectly colour-coordinated accessories and 18 colours ranging from warm neutrals to cool grays and greens, Timberlake™ is engineered to complement any architectural style across Canada.
Available at Pro Materials in Newmarket, Ontario, supplying contractors, builders, and homeowners across York Region, the GTA, and Ontario. All products are available on a quote basis; contact us for wholesale pricing and current availability.
Double 5" Dutch Lap with deep shadow line and premium woodgrain texture — available nationally
| Length | 12' (3.66 m) |
| Panels/Box | 20 panels/box |
| Coverage | 200 sq. ft. (18.58 m²) per box |
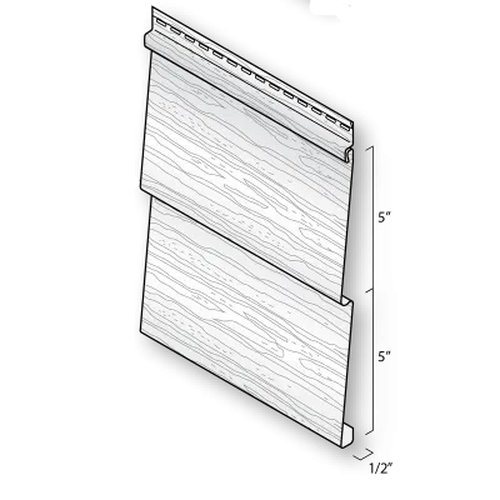
Double 5" smooth lap profile with woodgrain finish — special order only
| Length | 12' (3.66 m) |
| Panels/Box | 20 panels/box |
| Coverage | 200 sq. ft. (18.58 m²) per box |
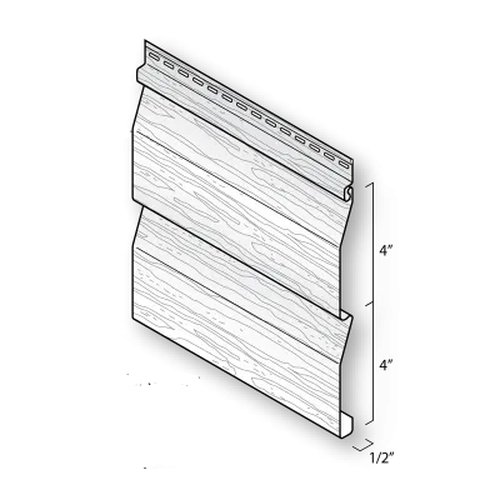
Double 4" Dutch Lap with classic beveled shadow line and woodgrain texture — available in ON, QC, Atlantic
| Length | 12'6" (3.81 m) |
| Panels/Box | 24 panels/box |
| Coverage | 200 sq. ft. (18.58 m²) per box |

Double 4" smooth lap profile with woodgrain finish — available in ON, QC, Atlantic
| Length | 12'6" (3.81 m) |
| Panels/Box | 24 panels/box |
| Coverage | 200 sq. ft. (18.58 m²) per box |
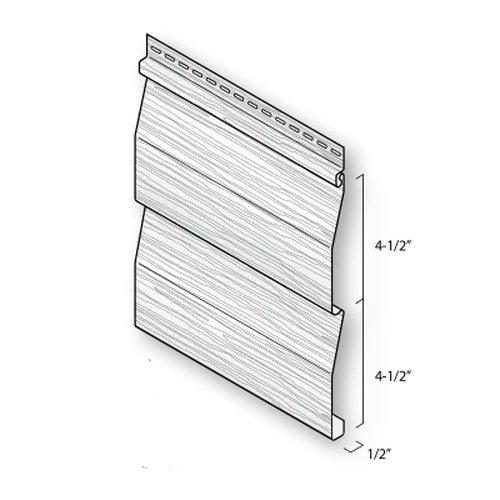
Double 4.5" Dutch Lap with woodgrain texture — available in MB, SK, AB, BC
| Length | 12' (3.66 m) |
| Panels/Box | 22 panels/box |
| Coverage | 198 sq. ft. (18.39 m²) per box |
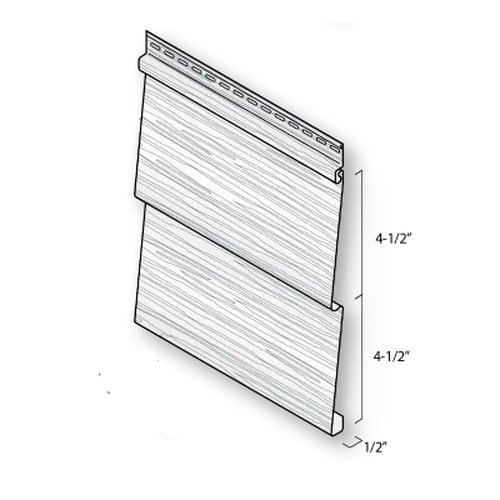
Double 4.5" smooth lap profile with woodgrain finish — available in MB, SK, AB, BC
| Length | 12' (3.66 m) |
| Panels/Box | 22 panels/box |
| Coverage | 198 sq. ft. (18.39 m²) per box |
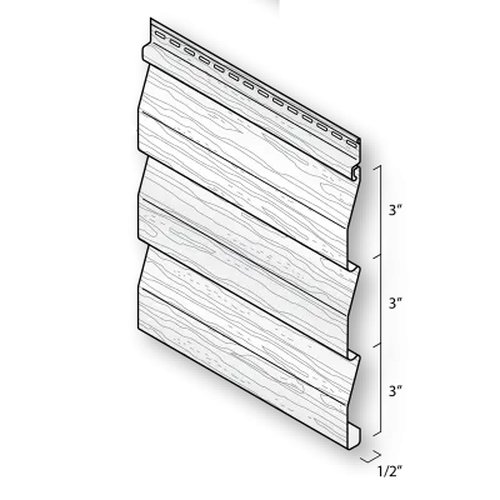
Triple 3" Dutch Lap with deep shadow lines and woodgrain texture — available nationally
| Length | 12' (3.66 m) |
| Panels/Box | 22 panels/box |
| Coverage | 198 sq. ft. (18.39 m²) per box |
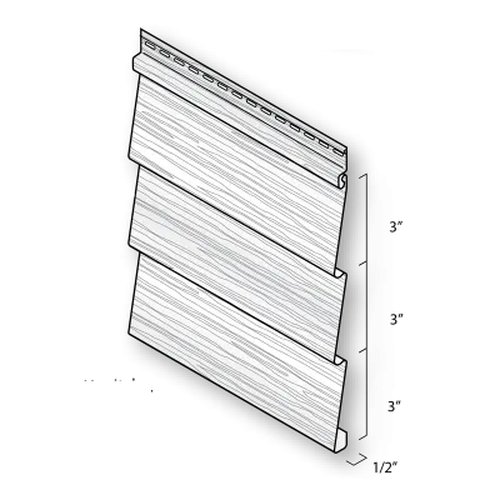
Triple 3" smooth woodgrain lap profile — available in MB, SK, AB, BC
| Length | 12' (3.66 m) |
| Panels/Box | 22 panels/box |
| Coverage | 198 sq. ft. (18.39 m²) per box |
Never face-nail siding — always fasten through the nailing hem only
Allow a minimum of 1/32" space between the back of the fastener head and the nailing hem — panels must move freely side to side
Space fasteners 12" to 16" apart on center
Center fasteners in nail slots — fastening at the end of a slot will cause permanent damage; use a nail-slot punch to lengthen slots if needed
Drive fasteners straight and level — nailing at an angle distorts panels and causes buckling
Leave 1/4" expansion gap at all openings and accessory channel stops (increase to 3/8" in temperatures below 40°F)
Do not caulk between panels, between siding and J-channel, or between siding and corner trim — panels must expand and contract freely
When installing a panel, push up from the bottom until the lock is fully engaged with the piece below, then fasten without stretching
When finishing top of wall, perforate cut edge with snap-lock punch approximately every 8" so tabs face outward
Overlap horizontal siding panels approximately 1" — excessive overlap restricts free movement and can cause product failure
Stagger end lap joints so no two courses are vertically aligned unless separated by at least 3 courses
Always overlap joints away from entrances and away from the point of greatest traffic
Check every fifth or sixth course for horizontal alignment; also check alignment with adjoining walls
Use fasteners long enough to penetrate a minimum of 3/4" into the nailable base
Install starter trim level — it sets the alignment for all subsequent courses; nail at 10" intervals
Keep starter strip ends at least 1/4" apart from corner posts and J-channels to allow for expansion
Apply undersill trim under all windows; use snap-lock punch on cut panel edges every 6" for secure fit
Apply drip cap above all windows and doors before installing siding over them
Do not install over foil-back foam insulation — voids Kaycan warranty
Asbestos siding is a regulated material — contact the appropriate environmental agency before residing over it
Check all local building codes and fire regulations before installation; local code requirements always take precedence
In new construction, avoid green lumber as underlayment — siding can only be as straight as what lies beneath it
General Tools
Specialty Tools
| Accessory | Purpose | Where to use |
|---|---|---|
| Vinyl Starter Trim (1085) / Kaylok Aluminum Starter Trim (108200) | First course anchor — sets the angle for the entire installation | Bottom of wall, level; nail at 10" intervals with 1/4" gap at corner posts and J-channels |
| 5/8" J-Trim (1035)Cut and bend top tab to provide flashing; keep 1/2" from roof line; overlap pieces by 3/4" minimum | Frames doors, windows, and wall penetrations; receives siding at gable ends and roof lines | Around all door and window openings (sides and top); gable ends; roof line intersections |
| H Trim (1179) | Creates a vertical seam between two siding panels on a long wall run | Vertical seams where panels must be joined end-to-end on a wall |
| Undersill Trim (1066) | Secures the cut top panel edge under a window sill or at top of wall | Directly below window sills; also at top of wall under eaves; use snap-lock punch on panel edge |
| Drip Cap (1185) | Diverts water away from window and door heads before siding is applied over them | Above all windows and doors, installed before the overlapping siding course |
| Inside Corner (1115) | Finished inside corners where two walls meet at an interior angle | Plumb at inside corners; leave 1/4" gap at top for expansion |
| 3" Outside Corner (1105)Flash behind corners with water-resistant material min. 10" on each side before installing | Finished outside corners where two walls meet at an exterior angle | Plumb at outside corners; extend 3/4" below starter strip; leave 1/4" gap at top |
Formula
Siding required = [Wall area (Step 1) + Gable/dormer area (Step 2) − Openings area (Step 3)] + 10% waste
1 square = 100 sq.ft. (standard industry unit for siding)
Step 1 — Sketch all four sides of the home; for each wall multiply height × width to get surface area in sq.ft.
Step 2 — Measure gables and dormers: for each triangle measure straight up from the base to the top, then multiply base × height × 0.5; add all gable/dormer areas together
Step 3 — Measure all openings NOT to be covered (windows, doors, chimneys) and multiply height × width for each; add together
Step 4 — Add Step 1 + Step 2, subtract Step 3, then add 10% for cutting waste: Siding required = [Step 1 + Step 2 − Step 3] + 10%
Step 5 — Divide total sq.ft. by 100 to determine the number of squares needed; round up to next whole square
Step 6 — Measure under eaves: multiply the length by the width of each overhang and add together (for soffit calculation)
Step 7 — Determine soffit squares: divide soffit total from Step 6 by 100
Step 8 — Measure linear feet of each accessory (starter strip, J-trim, corner posts, drip cap, undersill trim)
Step 9 — Convert sq.ft. to boxes: divide by coverage per box (200 sq.ft. for D4/D5 profiles, 198 sq.ft. for D4.5/T3 profiles)
Colour is manufactured throughout the panel — scratches or cut edges are not visible from normal viewing distance
Submit your spec list and we'll respond with pricing and availability - usually within one business day. Available in 18 colours for your project.
Get a wholesale quote
Tell us the product, colour, and quantity - we'll handle the rest.


