- 1
Substrate requirements: walls must be sheathed with either 7/16" OSB or 1/2" plywood in good condition and properly fastened. Structure must handle stone panel weight of 15 lbs/sq. ft. exclusive of wind or seismic load. Wall must be plumb and flat within 1/4" over 10'. STONEfaçade cannot be fastened over foam sheathing — install OSB or plywood over foam first. Maximum installation height is 30 ft above grade. Maintain clearance of minimum 4" above grade or 2" above a paved surface.
- 2
Housewrap requirements: for exterior applications, install STONEfaçade over a housewrap or weather resistant barrier meeting local building code requirements. CertainTeed recommends CertaWrap™ housewrap and flashing accessories.
- 3
Personal protective equipment: safety glasses or face shield when cutting, NIOSH N95 dust mask (minimum) when cutting or grinding — product contains crystalline silica; gloves (metal inserts are sharp), ear plugs/muffs, long pants and long-sleeved shirt, steel-toed boots, safety harness at heights, hard hat as required.
- 4
Tools required: wet saw (tile or brick saw with continuous rim diamond blade — NOT segmented), electric angle grinder with masonry wheel, cordless impact screwdriver or drill with 7/32" masonry bit (pilot holes) and 3/8" masonry bit (countersinking), 6' level, 12"–16" level, chalk line, tape measure, rubber mallet, small pry bar, tin snips, composite shims.
- 5
Fasteners: use #8 × 1.5" exterior rated wood screws (pan or truss head) for all panel and accessory installation — DO NOT USE NAILS. Screws must be fully threaded with a truss, pan, washer, or flat-surface head that mates with the fastening flange. Recommended: 304, 18-8, or 316 exterior rated stainless; minimum thread diameter 0.159", minimum head diameter 0.306", minimum length 1.5". Use impact driver for easier installation and to avoid stripping.
- 6
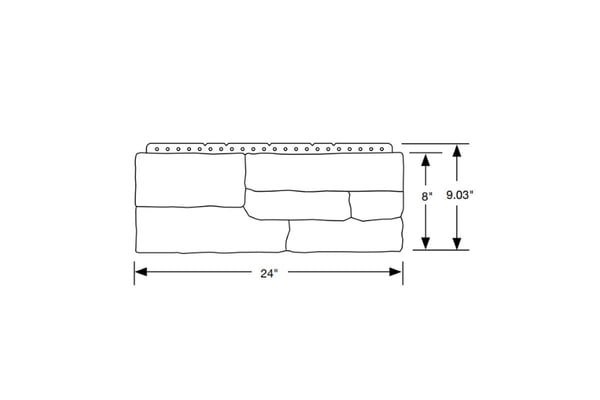
Estimating materials: Flat Panels — (wall width × wall height) minus windows/doors = net wall area; divide by 8 for number of cartons; add 10% scrap factor. Corners — corner height (ft) × 1.5 = number of corner panels; add 10% scrap factor. Sills — window width ÷ 2 = number of sill pieces; add 10% scrap. Starter Strip — wall width ÷ 10 rounded up = pieces needed. Allow one tube of color-matched caulk per 500 sq ft.
- 7
Starter strip installation: snap a chalk line at your starting point (minimum 4" above grade or 2" above paved surface). Position the bottom of the starter strip on the chalk line. Fasten every 8"–10" using #8 × 1.5" screws — drive screws tight to wall. Leave ½" gap between strips. For outside corners, hold strips back ½" from the corner on each side.
- 8
Corner installation: install corners before panels on each course. Cut off the rainscreen tabs along the bottom of each corner piece mating with the starter strip. Lock corner into the starter strip and verify level in both directions. Fasten with 2 screws on the long return. Alternate corner widths up the wall to avoid alignment of vertical seams. For inside corners: use flat panels butted together (weave alternating panels from each side), fashion a return with color-matching trim coil, or miter each mating panel.
- 9
Panel installation — first course: cut off the rainscreen tabs along the bottom of each panel mating directly with the starter strip. Position the first panel into the starter strip and butt against corner or trim. Check level on EVERY panel. Fasten to wall using the required number of #8 × 1.5" screws in the fastening flange (3 screws for panels 14" or wider; 2 screws for panels under 14"). Alternate panel widths randomly to avoid alignment of vertical seams.
- 10
Panel installation — subsequent courses: stagger vertical joints at least 3"–5" from previous course by varying panel widths. Place the course panel into the mating groove on top of the previous course and tap into place with a rubber mallet — groove must be free of debris. Check level before proceeding. Step back frequently to check appearance and avoid repeating patterns. Leave 1/8" clearance between stone and PVC millwork for expansion.
- 11
Cutting instructions: use a continuous rim diamond blade (not segmented) on a wet saw — one panel at a time. Place panel face up with insert side down. Clean cut edges by rinsing in clean water after cutting. For trimming and staggered cuts, use an electric angle grinder with diamond or masonry wheel. To cut holes (hose bibs, boxes), use a masonry hole saw, drill with masonry bit, or grinder with masonry blade. When panels are cut or modified and the fastening flange is removed, face-fasten with #8 × 2.5" screws: drill 7/32" pilot hole, 3/8" countersink hole (leave minimum ½" stone behind screw head), drive screw, cover with color-matched caulk. Always wear N95 respirator when cutting — product contains crystalline silica.
- 12
Care and maintenance: clean with soap and water and a nylon bristle brush. DO NOT powerwash — power washing removes color. DO NOT use harsh chemicals or acid products. Avoid salt and de-icing chemicals. Efflorescence (white powdery deposits) can occur naturally — avoid regularly wetting stone with lawn sprinklers as water minerals may discolor the surface.


