Skip to main content
Exterior Pro Materials
KaycanRichmond™

Comfort and Tradition

Kaycan Richmond™

Kaycan Richmond™ brings time-honoured 6" bevel styling to premium vinyl siding. The exclusive Cyclone-System™ double-thick nail hem and heavy-duty 0.050" panels deliver exceptional rigidity and wind resistance, while Chromalock™ technology keeps colour locked throughout the panel — without chipping or fading. A full 3/4" profile depth creates dramatic shadow lines that capture authentic traditional craftsmanship. Nine heritage-inspired colours — from warm Brick and Spice to deep Cobalt and Evergreen — available nationally across Canada.

0.050" (heavy gauge)9 colours

Available Colours

9
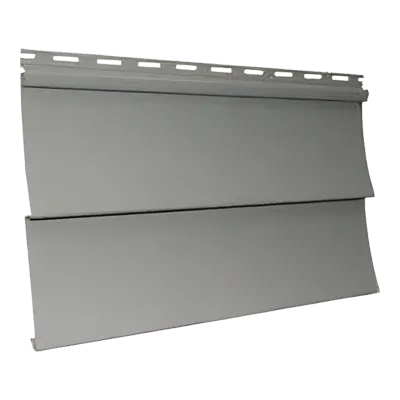
Kaycan Richmond™ - Brick

Brick

Richmond™ Collection

Richmond™ Collection(9)

Colours shown are approximate representations only and may appear differently on screen than the actual product. Request a physical sample before making your final decision.

About Kaycan Richmond™

Kaycan Richmond™ brings time-honoured 6" bevel styling to premium vinyl siding. The exclusive Cyclone-System™ double-thick nail hem and heavy-duty 0.050" panels deliver exceptional rigidity and wind resistance, while Chromalock™ technology keeps colour locked throughout the panel — without chipping or fading. A full 3/4" profile depth creates dramatic shadow lines that capture authentic traditional craftsmanship. Nine heritage-inspired colours — from warm Brick and Spice to deep Cobalt and Evergreen — available nationally across Canada.

Kaycan Richmond™ is a heavy-duty 6" bevel vinyl lap siding that combines time-honoured traditional styling with advanced Canadian-made vinyl technology. Featuring the exclusive Cyclone-System™ double-thick nail hem for superior wind resistance, Chromalock™ colour-lock vinyl that won't chip or fade, and a full 3/4" profile depth that delivers dramatic, authentic shadow lines. Richmond's 0.050" heavy-gauge panels and realistic woodgrain texture with low-gloss finish capture the essence of classic craftsmanship — built to last decades in Canadian climates. Available nationally in 9 heritage-inspired colours.

Available at Pro Materials in Newmarket, Ontario, supplying contractors, builders, and homeowners across York Region, the GTA, and Ontario. All products are available on a quote basis; contact us for wholesale pricing and current availability.

Installed cost in Ontario, 2026

$6 to $9CAD per square foot

Standard vinyl siding, supplied and installed

Corners, window returns and removing the old cladding land as line items before the first new panel.

See the cost breakdown

Installed range published by Ontario contractors and collected in our Vinyl Siding in Ontario: The Complete Contractor's Guide for 2026. It covers material and labour together. Pro Materials supplies the material, so this is not our quote: request a quote for supply pricing on this product.

Profiles & Specifications

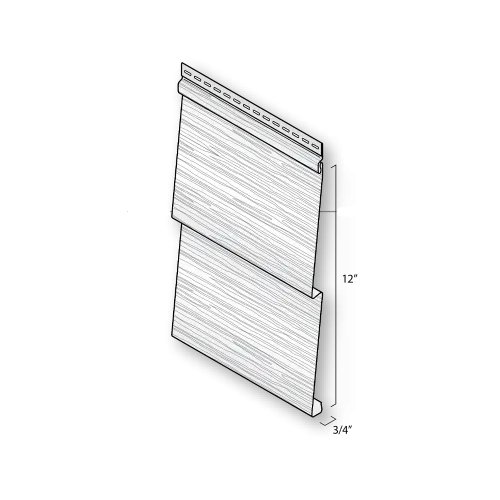
Kaycan Richmond™ - D6 Richmond™ Panel profile
0086D6 Richmond™ Panel

Double 6" bevel lap panel with full 3/4" profile depth and realistic woodgrain texture — delivers dramatic shadow lines and authentic traditional appearance

Length12' (3.66 m)
Panels/Box9 panels/carton
Coverage100 sq. ft. (9.29 m²) per carton
Gauge0.050" (heavy gauge)
Profile Depth3/4"

Compatible Accessories

Installation Guide

Critical Installation Rules

  1. Never face-nail siding — always fasten through the nailing hem only

  2. Leave 1/32" clearance between fastener head and nailing hem (panels must move freely)

  3. Leave 1/4" expansion gap at all openings, corners, and trim junctions — increase to 3/8" in cold climates or below 40°F

  4. Do not caulk between panels, between siding and J-channel, or between siding and corner trim — panels must expand and contract freely

  5. When installing a panel, push up from the bottom until the lock is fully engaged with the piece below, then fasten without stretching

  6. Drive fasteners straight and level — nailing at an angle distorts panels and causes buckling

  7. When finishing top of wall, perforate cut edge with snap-lock punch approximately every 8" so tabs face outward

  8. Overlap horizontal siding panels approximately 1" — excessive overlap restricts free movement and can cause product failure

  9. Stagger end lap joints so no two courses are vertically aligned unless separated by at least 3 courses

  10. Always overlap joints away from entrances and away from the point of greatest traffic

  11. Check every fifth or sixth course for horizontal alignment; also check alignment with adjoining walls

  12. Use fasteners long enough to penetrate a minimum of 3/4" into the nailable base

  13. Install starter trim level — it sets the alignment for all subsequent courses; nail at 10" intervals

  14. Keep starter strip ends at least 1/4" apart from corner posts and J-channels to allow for expansion

  15. Apply drip cap above all windows and doors before installing siding over them

  16. Do not install over foil-backed foam insulation — voids Kaycan warranty

  17. Asbestos siding is a regulated material — contact the appropriate environmental agency before residing over it

  18. Check all local building codes and fire regulations before installation; local code requirements always take precedence

  19. In new construction, avoid green lumber as underlayment — siding can only be as straight as what lies beneath it

Tools & Equipment

General Tools

  • Work table
  • Chalk line
  • Safety glasses
  • Tape measure
  • Carpenter's square
  • Ladders or scaffolding
  • Hammer
  • Tin snips
  • Utility knife
  • Level
  • Radial arm saw (with reversed fine-tooth blade for cutting vinyl)

Specialty Tools

  • Snap-lock punch — creates raised tabs on cut panels to lock into trim
  • Nail-slot punch — adds or extends nailing slots in repositioned panels
  • J-trim cutter — clean cuts on J-channel without distortion
  • Siding removal tool (zip tool) — unlocks siding courses during repairs

Fastener Requirements

Nails
Material
Aluminum, galvanized steel, or corrosion-resistant
Head
5/16" minimum
Shank
1/8"
Penetration
3/4" into solid wood
Screws
Type
#8 truss head or pan head, self-tapping
Penetration
3/4" into solid wood
Clearance
1/32" clearance required (do not overtighten)
Staples
Gauge
16-gauge minimum
Crown
Semi-flattened elliptical crown
Penetration
3/4" into solid wood
Hem clearance
1/32" from nailing hem edge

Accessory Applications

AccessoryPurposeWhere to use
Kaylok Aluminum Starter Trim (108200)2-1/2" aluminum starter with Kaylok system — provides solid base and resists wind liftFirst course anchor — sets the angle and alignment for the entire installationBottom of wall, level, 1" above finished grade or above foundation; nail at 10" intervals
3/4" J Trim (VJG034)3/4" deep channel designed for Richmond's full 3/4" profile depth; 1-7/16" face heightFrames doors, windows, and other wall penetrationsAround door and window openings — sides and top
3-1/2" Outside Corner (VCMNN3)3-1/2" wide face with 3/4" channel depth to accept Richmond's full profileFinished outside corners where two walls meet at an exterior anglePlumb at outside corners; Richmond panels slide into 3/4" channels
3/4" Inside Corner (VCGINP)3/4" wide channel, 1-3/8" base — matches Richmond's 3/4" profile depthFinished inside corners where two walls meet at an interior anglePlumb at inside corners; panels slide into 3/4" channels on each side

Estimating & Ordering

Formula

Siding required = [Wall area (Step 1) + Gable/dormer area (Step 2) − Openings area (Step 3)] + 10% waste

1 square = 100 sq.ft. (standard industry unit); Richmond carton covers 1 square exactly

  1. Step 1 — Sketch all four sides of the home; for each wall multiply height × width to get surface area in sq.ft.

  2. Step 2 — Measure gables and dormers: for each triangle measure straight up from the base to the top, then multiply base × height × 0.5; add all gable/dormer areas together

  3. Step 3 — Measure all openings NOT to be covered (windows, doors, chimneys) and multiply height × width for each; add together

  4. Step 4 — Add Step 1 + Step 2, subtract Step 3, then add 10% for cutting waste: Siding required = [Step 1 + Step 2 − Step 3] + 10%

  5. Step 5 — Divide total sq.ft. by 100 to determine the number of cartons needed (1 carton = 100 sq.ft.); round up to next whole carton

  6. Step 6 — Measure under eaves: multiply the length by the width of each overhang and add together (for soffit calculation)

  7. Step 7 — Determine soffit squares: divide soffit total from Step 6 by 100

  8. Step 8 — Measure linear feet of each accessory (starter trim, J-trim, corner posts, drip cap)

  9. Step 9 — Order accessories: starter trim and J-trim by linear feet; corners by linear feet; all available in 10' lengths (corners) or 12'6" (J-trim)

Colour is manufactured throughout the panel — scratches or cut edges are not visible from normal viewing distance

Storage & Handling

  • Store cartons flat on a level surface, supported along their full length
  • Keep cartons dry and away from rain and prolonged direct sunlight
  • Store away from areas where falling objects or construction activity may cause damage
  • Maximum stacking height: 6 boxes high — ensure stacks are stable
  • Maximum storage temperature: 130°F / 54.4°C (avoid blacktop pavement in summer, dark tarps without air circulation)
  • Do not drag bundles — carry or use a panel carrier to avoid scratching and distortion

Ready to order Kaycan Richmond™?

Submit your spec list and we'll respond with pricing and availability - usually within one business day. Available in 9 colours for your project.

Get a wholesale quote

Tell us the product, colour, and quantity - we'll handle the rest.

Request a Quote
or call us at+1 (905) 836-7272